Tips on how to integrate modern technology with traditional navigational techniques
By Ernie Messer
Photos by the author
 Have you ever been to a safety seminar or read an article that tells you, “Take advantage of all the electronic aids, but don’t forget about the “old way.” “Well, yeah,” you might say, “but how do I do that?” Here are a few tips, some which incorporate both old and new navigation techniques. Hopefully they will help you to develop a more robust usage of all the navigation tools available to you.
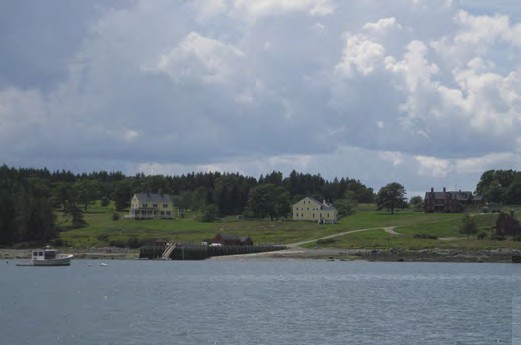
Careful navigation makes idyllic spots like Shorey Cove, ME safely accessible.
Several of these can be accomplished with a simple handheld GPS and a chart, making them useful in smaller boats without expensive electronic packages.
Tip # 1. Learn all of the features and capabilities of your GPS. Some of these may have to be called for in the “Setup” section or other “menu.” An example is the “position at cursor” on chartplotters. This gives the Latitude (Lat) and Longitude (Long) of the cursor (some brands call it a pointer) on the plotter. On some brands this comes up automatically, but on others it’s a menu or setup selection. This is a very powerful feature as it speaks in Lat/Long, the common language of both paper and electronic charts. On a handheld GPS, or chartplotter, make sure you can easily get to, or setup, a “page” showing Lat/Long, Speed Over Ground (SOG), and Course Over Ground (COG), as well as Bearing To Waypoint (BTW) and Distance To Waypoint (DTW). These are the five most important pieces of information your modern marvel can provide.
Tip # 2. Confirm Lat/Long on entered waypoints. Looking at your GPS or chartplotter, pick a buoy you want to go to and enter it as your waypoint. Note the Lat/Long and go over to your paper chart of the area. Find the Long along the top of the chart and run your finger down until you find the buoy, then run your finger to the right edge of the paper chart and see if the Lat agrees with your plotter Lat. Immediately you’ll know if you plotted the right buoy. If you need more accuracy you can use parallel rules, but once you get the feel of it, the simple method will usually suffice.
Tip # 3. Find a paper chart format you like. We use the excellent Maptech Waterproof Chartbook series (richardsoncharts.com) when we are cruising and racing. They are light for the amount of area covered (attention racers: light is fast), and because they are waterproof you can drag them into the cockpit when sailing to give you a comfort zone when making long runs through congested areas. Sometimes on the plotter by the time you’re zoomed in to see the detail you need, you lose the “big picture.” The paper chart always gives you the big picture.
Tip # 4. Get familiar with the paper chart features.
 On the Maptech series charts, and probably others, are “Waypoint” symbols which are little boxes printed on the charts. These boxes have an arbitrary waypoint name and the Lat/Long of the waypoint with a little line leading to the buoy or point. When you use one of these for waypoints in your GPS, move the cursor over the buoy on the plotter and make sure the readout “cursor position” on the plotter agrees with the printed waypoint box.
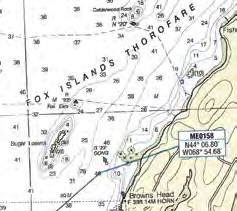
This is the approach to the “Sugar Loaves” Fox Island Thorofare as seen on the chart.
Tip # 5. Use “danger bearings.” In the “olden days” before GPS, we used “danger bearings” on an object we had a visual on. If the bearing on the compass slipped past a certain angle, it meant that we were on a course that would take us over a ledge or other hazard. For instance, if approaching Saybrook Breakwater light from Red Bell 8 there is a reef where the depth goes rapidly from 12 feet to four feet. If sailing with an ebb current you can be swept toward this reef as you slowly sail on, looking at the light on the end of the breakwater. Once the approach angle has slid to about 315 Magnetic (M), you are in real danger of finding the four-foot spot. So, as you passed by Bell 8 you might have a bearing from your boat to the light of about 329 Magnetic and you would watch the compass as you sailed on. If the angle to the light went to 320 or less you were getting too close to the reef and would harden up, tack, or start your engine.
In the same scenario with the GPS, you put the light in as a waypoint and have the GPS display “Bearing to Waypoint” (BTW). As you pass Bell 8 you’ll see the BTW displayed about 329 M. Watching that number, you’ll know you are being swept to the right if the number starts declining and again if the BTW slips down to 320 M it’s time to change course. You compute these “danger bearings” before you race or cruise and jot them down in your log or Wet Notes. If there is also a hazard on the other side of the approach, you can use a “bracket” of two danger bearings and keep your BTW between the two numbers for a safe approach.
Tip # 6. Keep a constant bearing. Approaching a buoy (or R/C boat) with a cross current, you can visually line it up with an object on the shore behind it. If the buoy appears to be sliding along the object on shore, you would steer to compensate for the current and the buoy would appear to remain stationary in relation to the object behind it. This requires good visibility and a feature easily seen on shore behind the buoy. With GPS, plug in the buoy (or its estimated position) as a waypoint and simply keep your Bearing to Waypoint (BTW) constant. These techniques will allow you to sail the shortest distance to the buoy or finish line (i.e. fast!).
Tip # 7. Use a “Danger Latitude” (or Long). Let’s say you’re tacking into a westerly to the south of Long Sand Shoal and want to avoid the shoal. Look at your chart and determine what Lat would always keep you clear of hitting the shoal. Note this Lat in your Wet Notes as a safe limit to the north. As you tack up the Sound, watch your GPS display when on the northerly tack and when you get to your determined danger latitude, tack. You can also use a southerly limit and “bracket” your course by staying between the two. This method often allows you to keep sailing where otherwise you’d turn on your engine and just pick a safe line between two danger zones.
 Tip # 8. Keep a chart in the cockpit when transiting any but the most familiar areas. When following GPS “orders” you must keep in mind that except for the most complex programs, the GPS doesn’t care whether the course is across water or land! If you’re careless, you can plot a course that will put you into danger. When you see a buoy, find it on the paper chart and make sure that you’re where you want to be. This is especially true if you’re using a handheld GPS. A common risk with chartplotters is having the range or “zoom level” set to the wrong level where important buoys or dangers may not show. The paper chart helps avoid these kinds of errors.
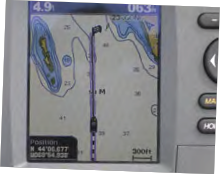
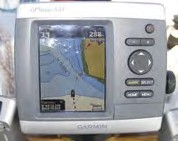
The approach to the “Sugar Loaves” on the chartplotter
 Tip # 9. Make sure what you see is what you think it is. If you see a land feature, maybe a water tank, along your route, use your trusty, old school hand bearing compass to determine its bearing. Then look on the chartplotter, where you might see several water towers and wonder which you are actually seeing. Move the cursor on your chartplotter over each indicated tower.
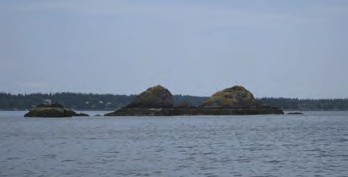
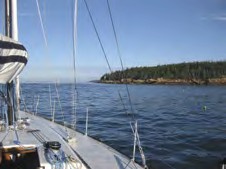
“Sugar Loaves” as seen from the boat
If the bearing to cursor agrees with your hand bearing compass bearing, you know exactly what you’re looking at.
Tip # 10. Steer an “ordered course.” This tip is a way to improve on an old school navigator, giving the helmsman a compass course to steer. It can be accomplished with a handheld GPS, chartplotter in sight of the helmsman, or an integrated system where, for instance, a B&G display can show GPS information. When someone other than the navigator is steering, the navigator can make the helmsman more accurate by providing him or her with a screen that shows Bearing to Waypoint (BTW) and Course Over Ground (COG). Instruct the helmsman to steer so that the COG remains the same as the initial BTW. Most helmsmen will quickly “get it,” and it becomes intuitive how much correction for drift is necessary to keep the BTW steady which is really the object. Matching the COG to the BTW helps to accomplish this.
Tip # 11. Learn to use a “light list.” When using Lat/Long to enter a waypoint on either a handheld GPS or chartplotter, use a light list to find accurate Lat/Long for most nav aids in your area. Light lists are traditionally a government publication and can now be found online (navcen.uscg.gov/?pageName=lightLists or notmar.gc.ca/. They also have encyclopedic amount of information on how to read charts and what the symbols and abbreviations mean. Buy a hard copy – it’s worth it!
Tip # 12. If you sail shorthanded, find a way to have your nav data available to the helmsman or at least in the cockpit. If using a chartplotter, find a place where it can be mounted and seen from the helm but not where it would be grabbed onto or stepped on. If using a handheld, buy or make a bracket so that the small screen can be seen by the helmsman and purchase the power cord (if available) to save batteries. If you have an instrument system, read your user manual and see if you can feed GPS data to the displays. Many modern systems allow this, while some like the Raymarine TackTick may require an extra box to feed the GPS output data to the instrument system.
Tip # 13. Use “bearing to cursor” to watch for a dragging anchor. If you have a handheld GPS or a GPS without a built in “anchor watch,” note significant features when you anchor that you’ll be able to see at night. For example, when anchored in Point Judith Harbor of Refuge, find two marks on the breakwaters as close to 90 degrees apart as possible. With a chartplotter, put the cursor on each and write down the result. With a handheld GPS, enter each as a waypoint and jot down the BTWs. As a backup, use your hand bearing compass and see if the bearings agree with the GPS. When you wake up at 0200 and wonder, “Is the anchor holding?” recheck the GPS against your written numbers. Use the bearing to cursor feature or the BTW to quickly check. Any major variations will indicate a need to monitor the situation. Practice the same drill with the hand bearing compass, and it will help prepare for the day the GPS doesn’t work.
Tip # 14. Use corner markers. This is another GPS trick you can use with a simple handheld GPS and a chart. Let’s say you’re taking a cruise from Long Island Sound to Newport. You’re about five miles from Point Judith and the visibility is closing down a bit. You want to set up for your turn up toward Newport, but are leery of cutting too close to the hazards surrounding Point Judith. All of a sudden your little GPS hand held seems inadequate for the task at hand. Don’t despair: a little combination of the old fashioned chart and modern satellites will soon put you at ease. You pull out your trusty waterproof chart and lo and behold, right where you want it to be, is a convenient line of Latitude at 41 degrees, 20 minutes north. Already you’re halfway there. If you stay south of 41-20 you’ll easily clear Point Judith; now where to turn? You could turn sooner, but if you wait until your Longitude drops down to 71 degrees, 26 minutes west, you will not only easily clear Point Judith to your left but also Point Judith Neck. Soon you’ll be close to the lighthouses and marks welcoming you to Newport.
Tip # 15. Learn to measure distances with your GPS and by inspection on the chart. A sailboat’s speed usually varies quite a bit, so rough estimates of distance will usually serve the purpose. Look at the Lat scale on the sides of your chart (not top or bottom; that’s Long). One minute of Lat always equal one nautical mile. Use a thumb and finger to measure a distance, then hold it along your chart where you want to know a distance (or vice versa). If you’re sailing at six knots and you measure three minutes of Lat you’ll go that distance in about half an hour. Practice a few times and compare it to distances measured with a pair of dividers until you reach a level of confidence. Many chartplotters have a feature hidden in the menus that allow you to measure two points independent of your position. Being able to measure distance and thereby estimate time en route is a valuable tool, whether on a paper chart or chartplotter.
Tip # 16. Always know where you are.
 This is the most important of these tips. Not only is knowing your position primary to keeping you safe on the water, it also reduces the stress level, letting you enjoy your boating, and your passengers to enjoy being around you!
“EB” buoy as seen on the chartplotter
A note to millennials and millennial wannabes: a smartphone or tablet is not a substitute for a fully functional chartplotter or GPS. By the time you get to the waterproof and rugged-ized levels required on a sailboat, you can buy a stand-alone, purpose built plotter that will serve much better. The Garmin 441 in the photos (at
Approaching the “EB” buoy, Bass Harbor Bar aboard Valour
about $400) has withstood hammering by mountains of green water in a bad Gulf Stream crossing and kept on tickin’!
Because it’s the season of giving, here are my top picks for a few stocking stuffers:
• Maptech Waterproof Chartbooks
• Light list for your area or next cruise
• Handheld GPS (Small boat primary or bigger boat backup)
• Primer of Navigation by George W. Mixter (a classic book; try Amazon or a local used bookstore)
• Nice hand bearing compass
Think Spring!
Ernie Messer has been sailing since the 1970s. He is a member of the Cruising Club of America, Off Soundings Club and Shennecossett Yacht Club. He and his wife have sailed New England for many years and have also raced to Bermuda frequently including three times double-handed! They sailed for 15 years on their Tartan 41 and now sail a restored Peterson One-Ton, Valour, out of Westbrook, CT. Last summer was spent doing the Newport Bermuda Race and return on a Hinckley 51, then a Maine cruise on Valour.


