By Morgan Williams
The stuffing box is the seal around a boat’s propeller shaft that keeps the water out and allows the shaft to rotate freely. Ninety percent of all sailboats with auxiliary inboard engines have a flexible stuffing box with traditional packing gland that usually goes unattended until it begins to leak, usually at the worst possible time.
The traditional stuffing box consists of stern tube which is slightly larger than the prop shaft. A gland nut or packing nut threads onto the stern tube. Inside the gland nut is the packing, which creates the seal. The packing is wrapped around the shaft and inserted into the gland nut. As the gland nut is tightened onto the stern tube, the packing is compressed against the shaft, creating a seal. Lubricating the seal requires that when the shaft turns, two to three drops of water per minute drips out of the stuffing box. There is also a locking nut on the stuffing box that locks the gland nut into position.
There are three basic types of stuffing boxes. The rigid stuffing box is mostly used in powerboat applications. The flexible stuffing box is found in most sailboats, and the relatively new flexible shaft seals are used in both sail and powerboats. In a rigid stuffing box, the shaft comes through the stern tube where the stuffing box is bolted to the tube or hull and is affixed or part of the boat. In these applications, alignment of the shaft to the stern tube is critical for proper operation.
Check your boat’s stuffing box immediately after launching,and regularly throughout the season. Note the correct installation of the hose clamps on this flexible stuffing box.
In a flexible stuffing box, the stuffing box is connected to the stern tube with a short hose and four hose clamps – two on the stuffing box side and two on the stern tube side – that hold the assembly together. The hose is usually a four-ply steam hose, which is very strong and durable.
Shaft seals do the same thing as a flexible stuffing box, but without the packing seal. The seals have a bellows hose which is clamped to the stern tube. On the end of the bellows is a carbon/graphite flange. At the engine end of the shaft there is a stainless steel rotor which mates with the carbon/graphite flange. The stainless rotor is pressed against the flange, compressing the bellows and creating a seal between the flange and rotor. When the shaft turns, the carbon flange is fixed and the stainless rotor spins with the shaft. The graphite provides lubricant and a thin layer of water provides the seal for the shaft. Most shaft seals have a nipple for a vent hose to ensure that the stern tube remains full of water for cooling the carbon/graphite flange. On high-speed applications, the vent tube is connected to the raw water side of the engine, so seawater can be injected into the stern tube for cooling.
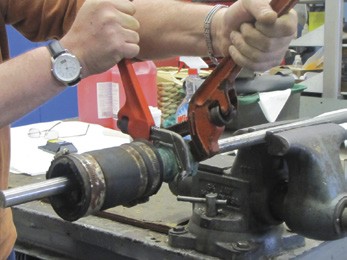
As with all jobs, disassembling a stuffing box is easier if you have the right tool, and the best tool for the job is the Ridgid E-110 wrench (you’ll need two).
There are three basic types of stuffing box packing: flax packing, Teflon packing, and graphite packing.
Flax packing has been around for 100 years. This greasebased packing can last for years and is very reliable. The one drawback to flax packing is that if the stuffing box gland nut is overtightened, flax packing can heat up in the gland nut, which causes dangerous temperatures and scoring of the shaft. So, when adjusting a stuffing box with flax packing, hand tighten the nut, adjusting it to reach the two to three drops per minute rule.
Teflon packing is great to use, and can last longer than flax packing. But this white material is hard to cut properly and requires a fresh razor blade. It’s also tricky to adjust the packing gland to get two to three drips a minute, and a number of adjustments may be needed to get it right.
Graphite packing is excellent because it’s a lubricant, which reduces the chance of burning the shaft. There are two drawbacks with graphite packing. It is very expensive and it can promote corrosion because graphite is high on the galvanic table, although I have been using it for years without an issue.

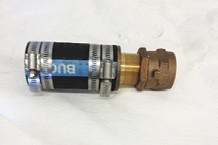
This “cutaway” photo, courtesy of the Chesapeake Bay Alberg 30 One-Design Association, shows the orientation of parts inside a flexible stuffing box. © alberg30.org
Repacking a stuffing box is a simple task. You’ll need two adjustable wrenches or two pipe wrenches. The tool that works the best is the Ridgid E-110 wrench. You must grab the gland nut and locking nut in opposing directions, to reduce the torque on the stuffing box hose. Once you have broken the lock nut and the gland nut free, spin the gland nut off the stuffing box towards the transmission. Now the fun really begins: removing the old packing. The best tool to use is the corkscrew-like tool available at any ship’s store. You screw the tool into the packing inside the gland nut and pull out the old packing.
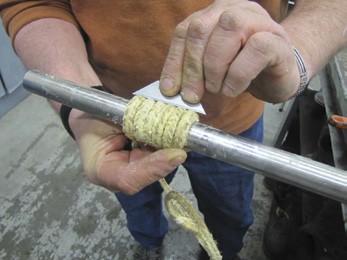
To make properly sized rings of flax packing, wrap a length tightly around the prop shaft and cut across the rings with a sharp razor blade.
Now it’s time to size up the new packing. Packing comes in various sizes, with 3/16 inch and ¼ inch the most popular sizes for shafts in the one-inch range. It is very important to match the size of the packing to the opening in the gland nut. To cut the packing to length, wrap a length of packing around the shaft five times and pull it tight around the shaft. Using a sharp razor blade, cut across the rings with a diagonal cut. You now have four or five sized rings of packing. Now, insert the packing rings into the packing nut, offsetting the joints of packing from one wrap to another by 120 degrees. Generally, three to four rings will fit inside the nut.
Once the packing is in the gland nut, tighten the gland nut on to the stuffing box. I usually hand tighten the gland nut and then give it ¼ turn with a wrench, and then lock the nut to the gland nut. I make final adjustments after the boat is launched. As soon as your boat is launched, check the stuffing box. If it is leaking before you start the engine, it needs to be tightened up. Only tighten the nuts one quarter turn at a time. When the water stops dripping, start the engine and put the transmission into gear for a few minutes. Then shut down the engine and feel the stuffing box. If it is hot, the packing gland is too tight. Adjust the gland, restart the engine and recheck the stuffing box. Some warmth is okay in the beginning while the packing sets in. Remember to watch for the two to three drops a minute coming from the stuffing box while the shaft is turning.

Rings of flax packing should be inserted into the packing nut with the cuts offset by 120 degrees from one ring to the next.
While working on a stuffing box, it’s also a good time to inspect the hose clamps for corrosion and wear. Take a look at the hose for cracking or softness, indicating it’s time to replace it.
Happy motoring.
Morgan Williams operates Holmes Marine Services Inc., a full service mobile marine business specializing in sailboat repairs including diesel engines, electrical and charging systems, steering and propulsion. Morgan can be reached at 203-395-1051 or HolmesMarine@sbcglobal.net


One thought on “Stuffing Box Maintenance”