Story and photos by Roger Hughes
The two levels of vinyl-coated wire lifelines on my 50-foot brigantine schooner Britannia were well past their prime. Sections of the vinyl coating had faded into a dull brown, with parts chafed and cracked, exposing the wire, and many of the chrome fittings had lost their luster. If I accidentally ran my hand along an exposed section, it often resulted in blood. They simply had to be replaced, not only for safety but also for appearance.
Lifelines are intended to stop someone from falling overboard, so that is the primary consideration in any replacement. But this does raise another important question, how does a person who does fall overboard get back on board through, or over the lifelines? Thinking about this brought back memories of an incident when I was chartering my boat in the Mediterranean.
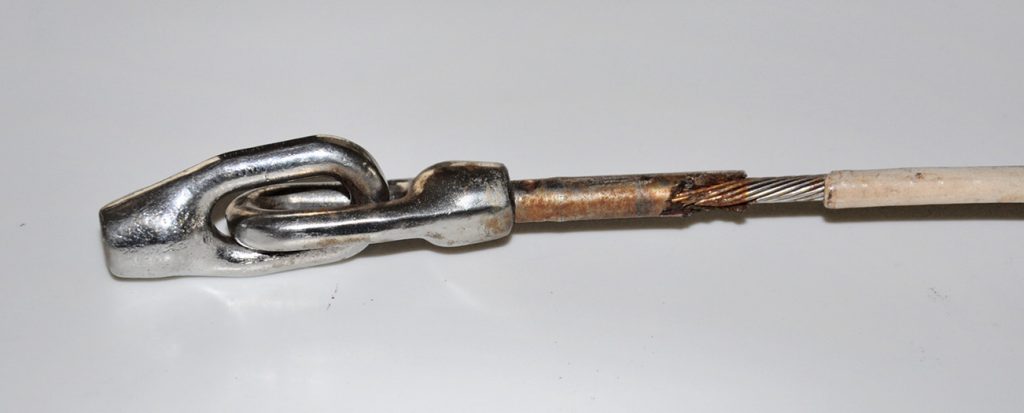
One example of what seawater can do, even to stainless steel wire.
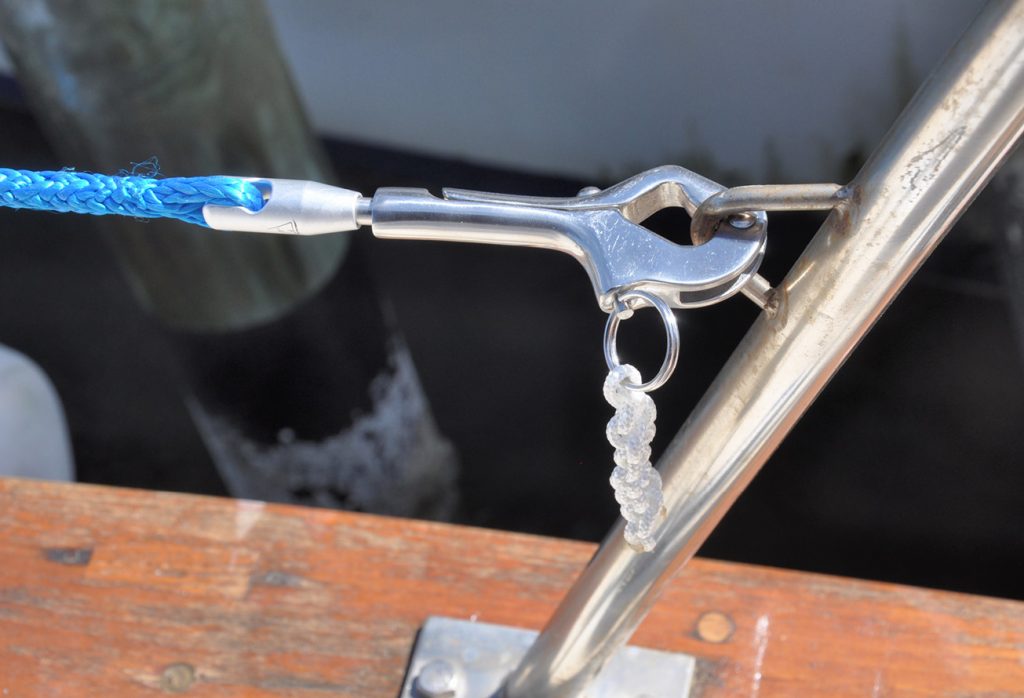
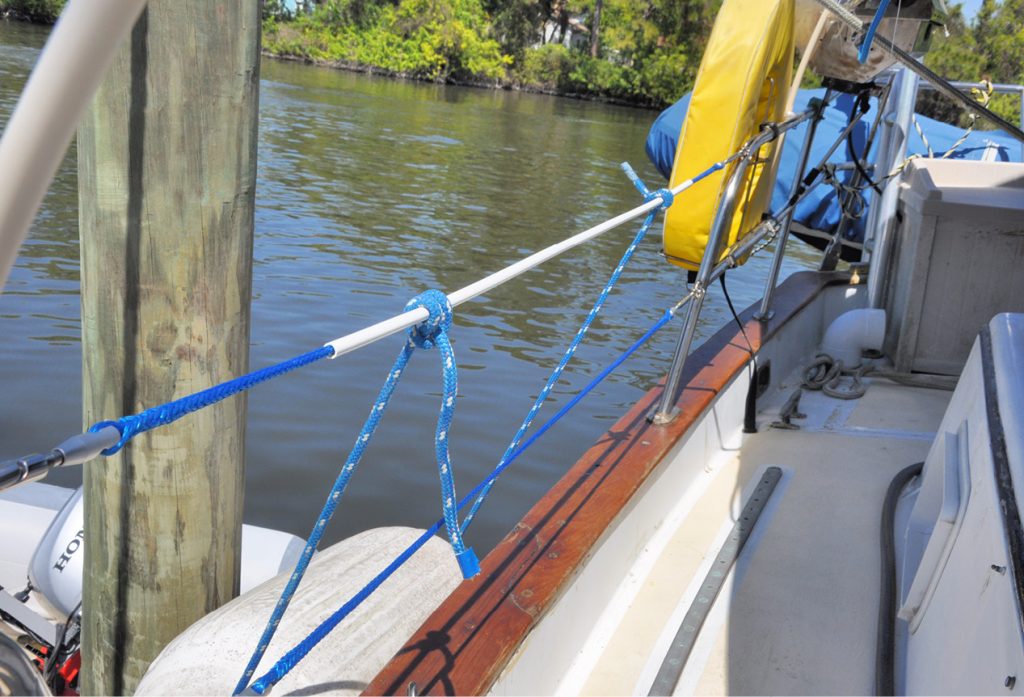
This special splice-line fitting (between the pelican hook and blue rope) is designed for Dyneema line.
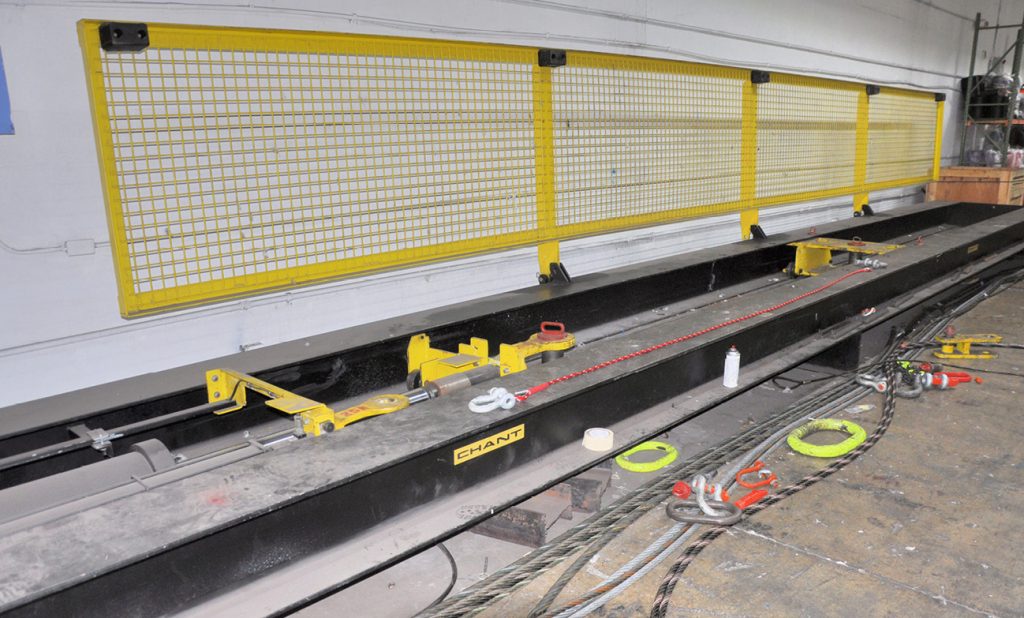
Known as The Rack, this hydraulic rope testing machine at Miami Cordage can snap any rope, including a 3” diameter Navy hawser.
Man Overboard!
We were at anchor, and a guest foolishly climbed down our boarding ladder with a wool poncho over her costume. It didn’t take but a few minutes for the poncho to become waterlogged and the lady was in trouble. She was unable to even get a foot on the first rung of the boarding ladder, never mind climb back up. She jettisoned the weighty poncho and clung to the ladder while I thought about how to get her back aboard. I should state here that the boat had a flat hourglass transom, not a sugar-scoop like many new hulls, that frequently also have a swim ladder which makes getting back on board much easier. When rescue is from alongside, however, dropping the lifelines makes the operation easier. The lady was much too big to physically pull up the side of the boat, so I quickly rigged the main boom with a snatch-block and a line with a loop big enough to pass around her back and under her arms. The inboard end was led to the electric windlass warping drum. As I set this up, my wife released the pelican hooks on both wire lifelines and we were able to lower them between two stanchions. The hapless lady was then hoisted over both lowered lines, to plop on the deck like a landed fish. The only thing she suffered, apart from her dignity, was bruising on her arms and back from the rope. This incident showed me how difficult it can be to get someone back on board.
Another real emergency that might require lowering lifelines would be to launch a heavy liferaft from the deck. Britannia has an eight-man ocean raft that weighs over 140 lbs. in a canister on chocks in the center of the deck. I have great difficulty moving it on my own whenever I want to clean under it, and the canister is too big to slide between the lifelines. The lifelines would definitely need to be lowered or cut to allow it to be heaved over the bulwarks. The same problem might occur with a heavy dinghy stowed on deck, that needed to be launched in a hurry.
The permutations for confusion if someone actually does go overboard are considerable and hardly predictable. It’s therefore only sensible to make retrieval as easy as possible. It is to be hoped that in conditions where a man-overboard is more likely to occur, everyone would be wearing lifejackets and tethers. If a line could be tied to the harness safety ring it would make the chances of hoisting someone back aboard much easier, but lowering the lifelines would make it even easier.
Lifelines
Most boat lifelines have pelican hooks at one end, that can be released to lower the lines. Britannia’s were the old style, with a locking ring over the release lever. When the wires were tight it was very difficult to pry the ring back over the latch by hand, and pliers were necessary to squeeze the latch. A new type of pelican hook from C. Sherman Johnson Inc. has a pin, like a snap-shackle, that releases the hook even with the lines in maximum tension. Lines can also be released by unwinding the tensioning turnbuckle toggle at the other end, but if the line is tight, it too can be difficult to unwind by hand. I found a neat little adjustment tool at csjohnson.com that fits in the center small hole of a tubular turnbuckle and is much better than pliers or the bit of old wire I’ve been using for years. I removed all the locking nuts on my turnbuckles because they also need pliers or wrenches to release them, and in a dire emergency speed may be critical.
If for any reason lines cannot be released, a final option would be to cut the wire, and that requires long-handled wire cutters for 3/16” wire. But what if the lifelines were rope? That would be easy to cut, but would it be strong enough?
Alternatives
I decided to look at the pros and cons of wire and rope. Maybe there was now a better way? Like nearly everything on boats, people have their preferences and opinions. There’s certainly more than one way to replace lifelines and the opinions expressed here are entirely my own, and since we are considering life-lines, no responsibility is accepted for any adverse consequences.
Regarding strength, I couldn’t find any manufacturer who gave the strength of their material when used specifically as lifelines. All I could find for both wire and rope is “tensile strength,” or “working load.” No account is taken for stanchions either, which are integral to any boat’s lifeline system. Whatever I decided to use to replace my lines, it had to be no thicker than 3/8” diameter, to pass through the 7/16” holes through the stanchions. My choices were white vinyl-coated stainless steel wire or Dyneema rope, available in various colors.
This neat tool makes it far easier to open turnbuckles than my bit of wire.
Uncoated wire can become almost untouchably hot in the Florida summer, and I don’t like gripping thin wire with bare hands anyway, so I didn’t want to consider that. Vinyl-coated wire is very commonly fitted by manufacturers and sold through after-market suppliers. It looks smart when it’s new, but over time water can enter at the ends and wherever chafe has exposed the wire. Eventually, this causes corrosion that may not be visible under the covering. Wire is however very strong and 3/16” 7×7 strand wire has a working load of 3,700 lbs.
Dyneema rope is stronger, size-for-size, than stainless wire. The possibility of substituting rope for lifelines therefore becomes a viable possibility. I found Miami Cordage Inc. (miamicordage.com) , a rope maker hidden in the industrial depths of Miami. Most recreational boaters will not have heard of this wonderful Aladdin’s Cave of rope because nearly all of their product goes to the United States Navy and Coast Guard, along with other industrial outlets. Yet they make every conceivable type of rope from old style three strand to 12-strand Dyneema, which they call “Ironlite.” Their prices are considerably less than the retail outlets most boaters used. Their ¼” single braided 12-strand has an amazing tensile strength of 8,000 lbs.
Cost comparison: Defender’s price for 7×7 3/16” vinyl-coated wire was $1.79 per foot, while ¼” 12-strand Dyneema Ironlite in blue was $0.60 per foot from Miami Cordage.
End fittings: A significant additional cost is replacing the turnbuckles and pelican hook fittings on each end if new ones are needed.
Stretch: Once tightened up bar-tight with the turnbuckles, wire does not stretch further. Dyneema only stretches (creeps) about 1%, but once stretched does not move much after that. Dyneema can also be set up bar-tight.
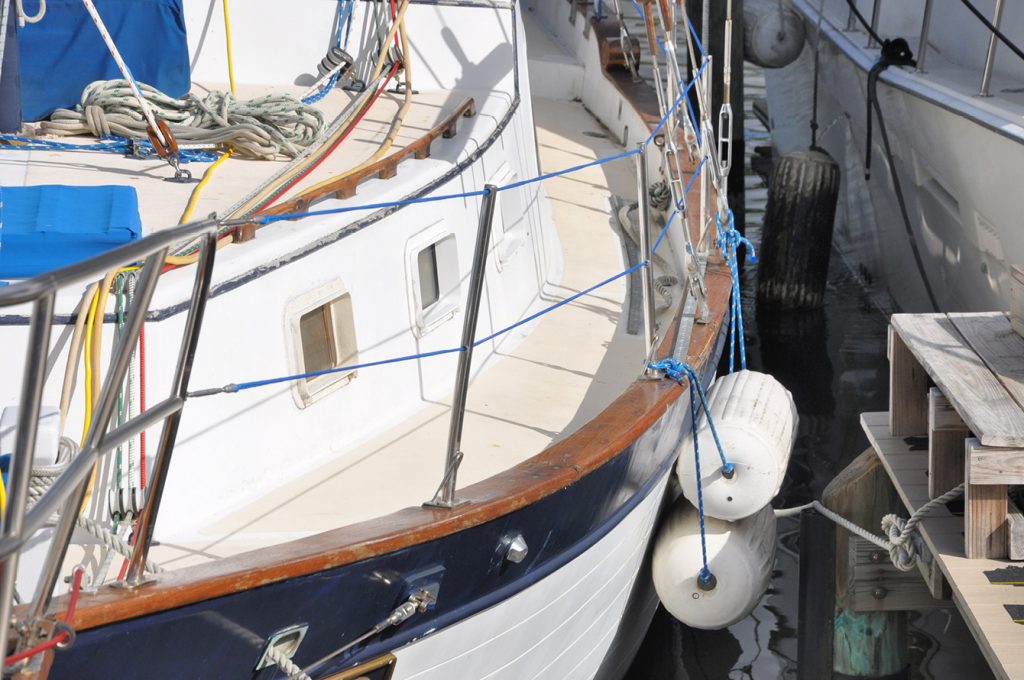
Chafe: All lifelines are subject to chafe by anything rubbing against them: sheets, lines, fender lines, and where they pass through stanchions. Britannia’s stanchions have a 7/16” diameter flared tube in each cross-through hole that minimizes chafe at those points.
Cleaning: White vinyl-coated wire can simply be wiped with a rag and some bleach now and again, but the vinyl still fades over time. Dyneema has a shiny, slightly slippery texture that can be cleaned with soap and water and is available in many colors. I have had my lines for three years with no sign of UV discoloration.
Installing new lifelines
Wire: I calculated that I needed about 150 feet of wire and 16 threaded ends to replace my old wire, and at least three new turnbuckles to replace rusty old ones. The conventional method of attaching threaded ends to wire is to compress (swage) the fitting to the wire. This can be done using a hand-swager tool, ($42 from Defender), but it is tedious to do. First, the vinyl coating has to be cut back a couple of inches, exposing the wire, which in itself is not easy and best done in a sturdy vise with a sharp box cutter. Five crimps are recommended on each fitting by using a wrench to tighten the bolts on the swager tool. I needed 16 fittings – that’s 80 crimps! Even if each swage only took five minutes it would take nearly seven hours. Defender also sells a long-handled crimping tool that makes short work of swaging multiple fittings, but unfortunately it is $279. Also, hand-swaging only produces 65% of the strength of the wire, but a crimping tool increases this to 85%.
Britannia’s finished lifelines look very smart, and are much stronger and lighter than the wire lines they replaced.
An alternative method, which does not require swaging or any special tools, are wire ‘Sta-lok’ fittings by CS Johnson. These are easily assembled on wire using regular wrenches and actually provide 100% of the strength of the wire, and are approved by Lloyds of London for lifeline fittings. Boats with wire lifelines should also have a good quality wire cutter on board to chop the wire in an emergency.
With this reality of hand-swaging, I decided to ask for a quote from West Marine Rigging Services for vinyl-covered wire with end fittings professionally attached. I needed four 30’ lengths and four 6’ lengths. The price was $784 just for the wire! I therefore decided to look seriously at rope!
Rope lifelines are easily lowered in the event of an emergency, or when launching a liferaft or dinghy from on deck.
Rope: Rope can be attached to existing toggle end fittings with either a splice or even a knot, but CS Johnson has special rope turnbuckles and pelican hooks they call “Splice-Line” fittings to attach Dyneema. The rope is spliced directly around the fitting without a thimble and the chafe is reduced to a minimum. Single-braid Dyneema is hollow with no center core, and much easier to eye-splice than double braided line. The twelve-strand rope is first tapered by removing four pairs of strands, then the end is buried deep inside the standing part and lock-stitched. This is an easy operation with a special 14-inch-long splicing wand from Brion Toss Yacht Riggers (briontoss.com). This fid enables the tapered end to be gripped by the wand, then pulled through the core, instead of pushing it with a conventional fid. With 16 splices to make I was very thankful to have one, which can also be used for other rope work. I estimated the job it would take about three hours. Miami Cordage makes Ironlite in many colors, including solid blue, which would nicely match Britannia’s royal blue color scheme.
These chafe guards will significantly prolong the life of Dyneema lifelines.
Advantages of rope over wire
¼” Dyneema is much stronger than 3/16” wire: Dyneema 8,000 lbs; wire 3,700 lbs.
Dyneema is not subject to corrosion or affected by rain or seawater and is easily inspected for chafe.
Any section of a rope lifeline can easily be lowered between stanchions because the line slides through the stanchions and bends easily. Wire does not slide or bend very easily.
If necessary, rope lifelines can be cut with a sharp knife. Wire needs a long-handled wire cutter.
Rope lifelines can be replaced without tools or fittings, even at sea.
A spare 50’ length of ¼” Dyneema is much easier to store than the same length of wire.
Dyneema is very much lighter than wire rope. My complete wire lines weighed 13 lbs. The same length of Dyneema rope weighed only 2.4 lbs. This started me to imagine the weight saving in my schooner’s 700 feet of 3/8” stainless steel standing rigging, but that’s another story.
A strength test
Before I decided to use rope, I wanted to answer a very important question. Different manufacturers specify their ropes with different poundages for the same thickness, so what would be the actual failing poundage of my particular Dyneema lifeline setup?
Miami Cordage has a 40’ hydraulic rope testing machine called “the rack,” which is regularly government inspected since they sell to the Navy. I made a 10’ ¼” Dyneema test rope with eye splices at both ends. This was attached to the rack and I watched as the dial of the machine stretched the line past 2,000 lbs. when I expected to see a splice break any moment. At 4,000 lbs. the rope looked as stiff as iron, then finally, at an incredible 7,596 lbs. the actual rope snapped with a dull thud, yet both my splices held! That’s 3.8 US tons, and I have a certificate from the test to prove it.
This was good enough for me, and I decided on Dyneema lines. Since the only thing that can weaken Dyneema lines is chafe, I decided to cover the upper lines with plastic pipes that clip completely over the rope and act as chafe guards. These are 6’ long and only $2.12 each from West Marine. One of the areas where chafe is likely is where it passes through stanchions and the 5/16” pipe also passes through Britannia’s stanchion holes, yet still allows the rope to move freely inside. If any of the pipe guards show signs of chafing it will be a simple matter to replace one section before it wears the Dyneema itself. The covers also increase the line thickness to nearly ½”, which makes holding the lines much more comfortable.
Costs
The total cost for 150’ of 3/16” vinyl-coated wire, plus 16 threaded swage ends, a hand swager tool, and a wire cutter would’ve been $652. Two hundred feet of ¼” Dyneema, a splicing wand, and three new turnbuckles cost me $292.
These prices were based on using my existing pelican hooks, turnbuckles and other fittings, but I finally decided to do the job properly with new parts. I used CS Johnson Splice-Line rope fittings, including new turnbuckles and beautifully crafted quick-release pelican hooks. I used Miami Cordage’s 1/4-inch Ironlite Dyneema in blue for my lines. The whole installation took two weekends, and I eventually got down to ten minutes for each Dyneema splice. Practice makes perfect.
Britannia’s finished lines now look very stylish and professional, and I’m confident that in the event of an MOB emergency, I will have the least possible obstructions to get the person back aboard. I just hope I’m not the first guinea pig to test the system for real. ■
A freelance writer for boating magazines in the US, UK, Australia and New Zealand, Roger Hughes is an Englishman who lives near New Bern, NC, and has been messing about on boats for half a century as a professional captain, charterer, restorer, sailing instructor and happy imbiber – on a lot of boats. He recently completed a restoration and extensive modification of a once run-down 50-foot ketch, renamed Britannia. This included converting the rig into a brigantine schooner, with a rollaway squaresail on the foremast, along with many more innovations and inventions, like a full size hot-tub bath and electric dinghy hoist.
All of Roger’s published articles can be read free of charge at schooner-britannia.com. People are free to copy any of the ideas, and Roger also offers extended advice, on a consulting basis, to anyone wishing further information or help.